Forum Replies Created
-
AuthorPosts
-
I am not sure why this would not work for you, the source of the problem is definitely the extra bracket at the bottom of the skin CSS.
Have you made any other customizations to the file that may be causing the problem?
All others who have reported this issue have had success when removing the last bracket.
I will work this fix into the next update.
In the mean time, if you would like this fixed, here is what you need to do:
- Go to your box.php file and search for:
tl_lkin_text - Replace that text with
tl_li_text - Go back to the Author Box options, re-enter your Linkedin text
- Save the Author Box and re-fresh the page. All Done
Hope this helps
Hansdm,
I did re-send your download link to the email you used at checkout.
If you do not receive this download just let me know and I will try again or simply send it manually.
Thank you so much for helping me out on this one.
Anyone else having a problem with this, you can either delete the very last
}from the Skin Editor > Skin CSS page or you can wait for me to send out the update and simply re-upload the new Flatisfy version.Thanks again Ian for finding this bug.
Whoops, I accidentally forgot to add the
.post_boxclass in my previous solution.Give this code a try:
.post_box img.wp-smiley {
    margin-bottom: 0;
}
This should do the trick.
Try using this code instead:
img.wp-smiley {
    margin-bottom: 0;
}
Should take care of the problem.
Looks like you figured this one out. Great job.
You should be able to create forms using almost any email provider with your custom HTML form code but it may require some adjustments to your CSS and/or HTML to make it look the way you want it to.
Adding the following classes to your HTML form code should take care of most the work but may require some other minor adjustments to format everything correctly and ensure proper functioning. Below are the important classes:
Form class:
thesis_email_formName input class:
thesis_email_form_nameEmail input class:
thesis_email_form_emailSubmit input class:
thesis_email_form_submitAdditionally, for adding a text title & description before the form, use the following classes:
Heading class:
email_form_titleDescription class:
email_form_introHope this information helps.
You’re very welcome, I hope you are enjoying the skin. If you have any further questions, don’t hesitate to ask.
Be well.
Hey Neil,
First of all, I apologize for the delay in my response and thank you so much for the kind words about Criss Cross.
If you are still looking for answers you can read below:
1) I do currently plan on continuing with updates to Criss Cross for a long time regardless of its sales.
2) The way responsiveness was setup for Criss Cross breaks the content up once it reaches the width of the content & sidebar areas. To change this may require messing with the media query options in your skin CSS file (not recommended if you are not familiar with CSS media queries). I will have to do some testing before I can come up with a concrete solution for you.
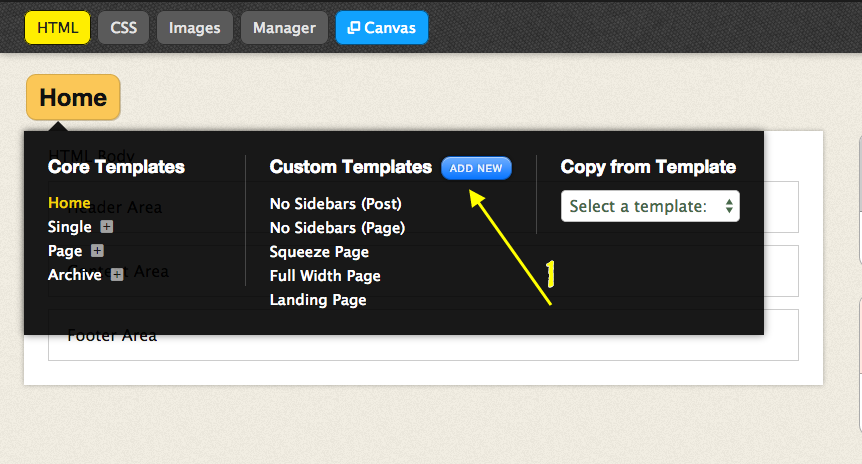
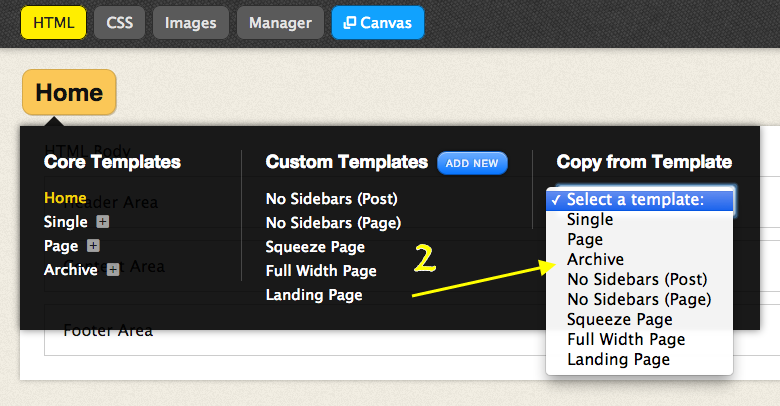
3) To use boxes on just one page you may want to create a custom template within your skin editor. To do this, visit your Skin Editor page and create a new template, name it and save it. Then populate it by duplicating a pre-existing template. Depending what type of page you want your box to show on (Page template, Single template, Full-Width template, etc) will determine what option you should select for duplication. The images below show where these options are:
After your new template is created, add the box of your choosing to the template and save it. Finally, when you create a WordPress post or page, select your newly created page template from the “Thesis Skin Custom Template” option on your WordPress post editor page.
4) Thank you so much for wanting to promote my product. I really appreciate that. I do have plans on setting up an affiliate program for Thesis Laboratory in the (hopefully) near future but would like to have a few more skins/boxes available for purchase before doing so.
Again, I am so sorry it took me awhile to answer your questions. I have been very busy working on my newest skin, Flatisfy, which is now available for purchase. I will do my very best not to let this type of delay happen again in the future.
I hope this information helps. Thanks again for all the kind words and best of luck with all your projects. If you have any further questions don’t hesitate to ask.
-Tom
First of all, I apologize for the delayed response and thank you so much for the kind words about Criss Cross.
If you are still looking for a solution to this, try the HTML code below:
<a class="ccs-button color-green" title="Button Link" href="#">Button Link <i class="icon-share-2"></i></a>
The code above will create a green button with your text and an icon (from the Criss Cross icon font page) displayed after the text.
Unfortunately, after looking through the icons, I am not sure if there is an “external link” icon included. You may need to use the same instructions but target the icon from an external plugin or stylesheet. Otherwise you are free to use any of the icon classes included with Criss Cross.
Hope this helps.
First of all, I apologize for the delay on my response.
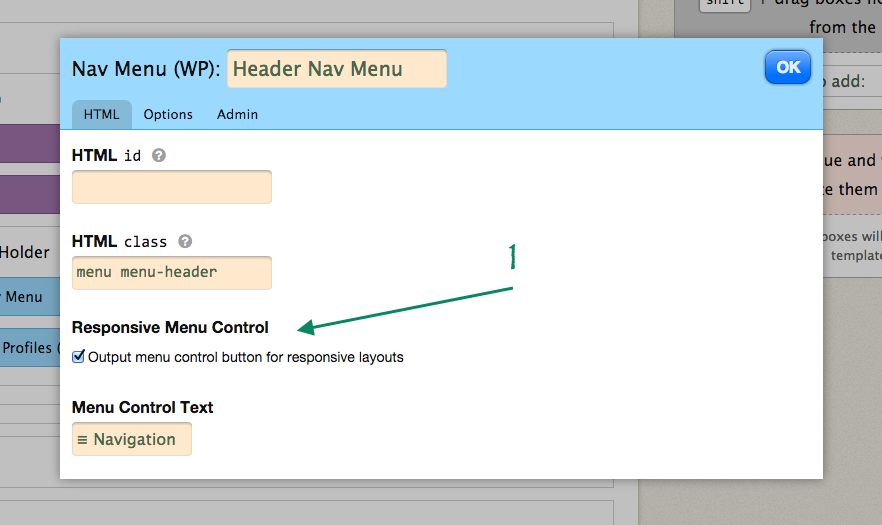
I am so glad you are enjoying the Criss Cross skin. Currently your site is unavailable to view but my best thought for this would be to check if you have the “Responsive Menu Control” option selected for your WordPress menu.
This option can be found on your skin Skin Editor page within your “Nav Menu Box”. The image below shows this option:
Hope this helps.
Excellent, I am glad you were able to figure this one out.
You’re definitely on the right track. The best recommendation I have for this will be to download a Custom PHP text box from the link below (it’s free):
https://github.com/voidzone/php-box
After you download the box, install it and add it to the area of your template you would like. Then place the full PHP code from your slider into it (including the opening and closing PHP tags), save, and you’re finished. The image below shows the code to add.

Alternatively, you could just add a regular text box to the area of your template you like and use the regular WOW slider shortcode to achieve the same results. This way you won’t need to download any custom boxes.
Hope this helps.
There is currently no .po file with the Flatisfy skin.
I will work on including this though. I apologize for the inconvenience.
This fix is similar to the menu-pointer fix:
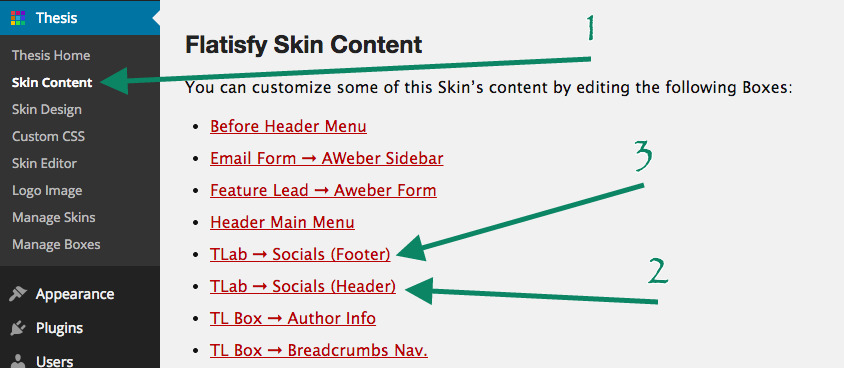
First, visit your Skin Content page and find the links for the TLab ➞ Socials (Header) & TLab ➞ Socials (Footer). The image below shows where they will be:
Next, Click on the links to each and you will be brought to a page with a checkbox options. From this list, there will be a checkbox to display/hide any of the social icons you have filled out within the TLab ➞ Socials option page. The image below shows the checkbox options page:
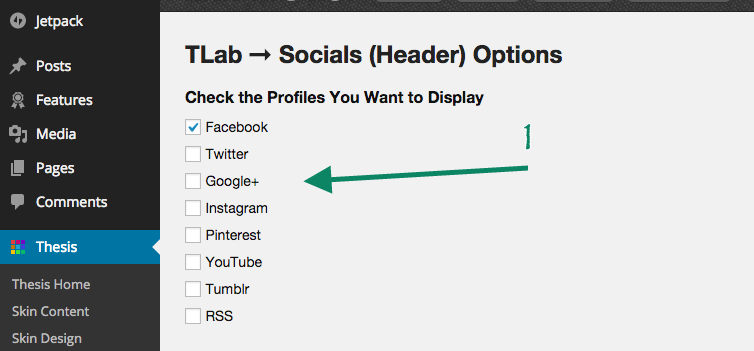
Finally, check the boxes of social icons you want to display and save your options.
Hope this helps.
-
This reply was modified 11 years, 4 months ago by
Thomas.
- Go to your box.php file and search for:
-
AuthorPosts